Setup honeypot for threat-intelligence
- 5 minsThis is the last blog for the year 2021, as you can see the publishing date but its worth fun though. Let’s just take you are here for, to setup a honeypot network though for free for first 3 months or could be around less than 5$ per months. Thats worth it for a personal set of threat intelligence at least for the first 3 months when its free :)
This offer stands when i am publishing this blog as i dont know about the future prices but for now i am talking about “Linode LLC”. Though if you are from Linode :) can you sponsor me a bit for writing about i am broke af as i am college student right now xd (My username karmaX), no worries Linode a great Cloud hosting provider providing vps at such cheaper rates thats really awesome atleast for us when we are college students/individual security resarchers huge shoutout for you guys.

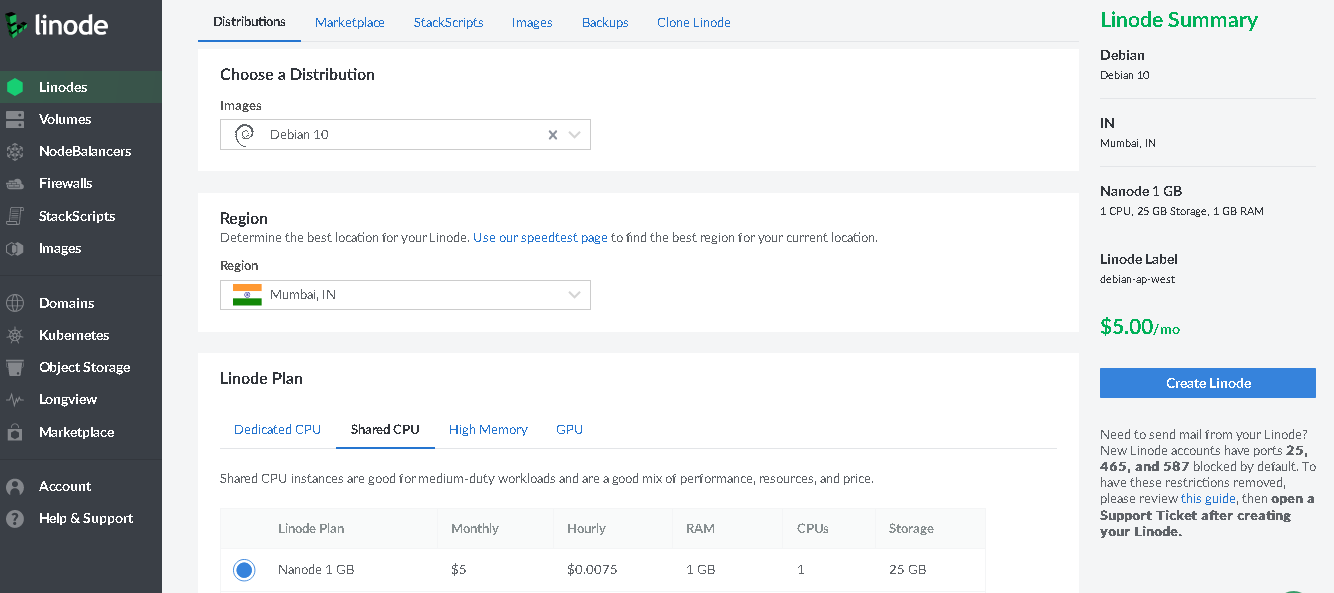
As you can see 100$ Credit for 60 day free trial approx 2 months, thats well enough.
Cool so for now, as i told you 5$ is enough we are going to setup a Nanode 1 GB for our honeypot and at the current scene Log4J RCE is popular we are setting up two honeypots Log4Pot https://github.com/thomaspatzke/Log4Pot and Cowrie https://github.com/cowrie/cowrie. Again huge shoutout for the repo maintainers.
Let’s just setup a new nanode.
After the server starts running ssh into the server
ssh root@<ip-address-of-server>
The first thing we do now is change the port for ssh and http-ports as we would be using these general ports as honeytrap
Let’s change the ssh port first nano /etc/ssh/sshd_config
Yes don’t judge me i use nano fu. 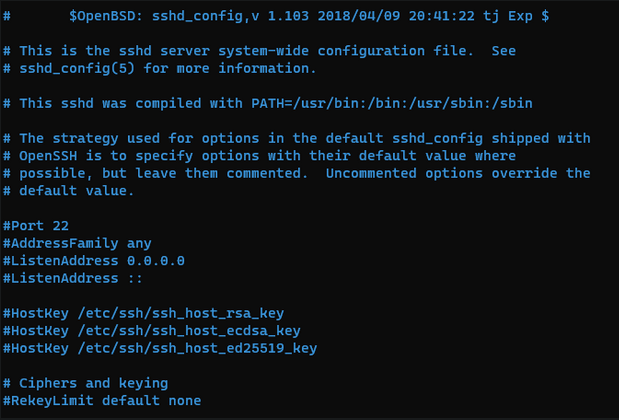 Figure. Before Port change
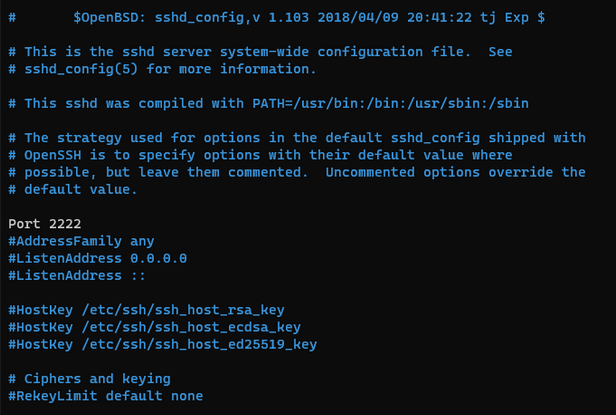 Figure. After Port change
Change the ports save and exit, and then restart the ssh service.
service ssh restart
Now redirect the general usage ports 22,23,80,443.
Though i didnt use HTTPS but still i will tell
iptables -t nat -A PREROUTING -p tcp --dport 22 -j REDIRECT --to-port 2222
iptables -t nat -A PREROUTING -p tcp --dport 23 -j REDIRECT --to-port 2223
iptables -t nat -A PREROUTING -p tcp --dport 80 -j REDIRECT --to-port 8080
iptables -t nat -A PREROUTING -p tcp --dport 443 -j REDIRECT --to-port 8443
These set of command will redirect any coming connection towards the incoming ports towards the destination ports
After setting up the server let’s add the honeypots.
Prepare the requirements!
apt update && apt install git zlib1g-dev libncurses5-dev libgdbm-dev libnss3-dev libssl-dev libsqlite3-dev libreadline-dev libffi-dev curl libbz2-dev
As we are adding log4pot that requires python3.8 we would be installing Python-3.8.2.
curl -O https://www.python.org/ftp/python/3.8.2/Python-3.8.2.tar.xz && tar -xf Python-3.8.2.tar.xz && cd Python-3.8.2 && ./configure --enable-optimizations && make && make install
This would install Python into your server you can check that by running
python -v
if that does not work python is not properly installed!
Let’s hope you have properly installed, if not just go down through the steps or ping me on twitter @karmaX8080
Cool let’s just move forward, start with setting up new users for our honeypots not in rootmode
Setup two user’s different for different honeypots let’s just say even if they bypass and have and shell they wont be able to get root access directly.
sudo adduser cowrie
sudo adduser log4pot
This will setup two users cowrie and log4pot
First let’s setup Cowrie
sudo su cowrie && cd && git clone http://github.com/cowrie/cowrie && cd cowrie && virtualenv --python=python3 cowrie-env
After executing these set of commands you will get a python virtual env setup just need to activate it start with cowrie
$ source cowrie-env/bin/activate
(cowrie-env) $ pip install --upgrade pip
(cowrie-env) $ pip install --upgrade -r requirements.txt
Okay, lets just setup cowrie, we have to make changes in cowrie.cfg.dist into stored in etc folder and set [telnet] enabled=true and change the hostname to something like fileserver03 and save and exit
now just fallback and let’s just start cowrie
$ bin/cowrie start
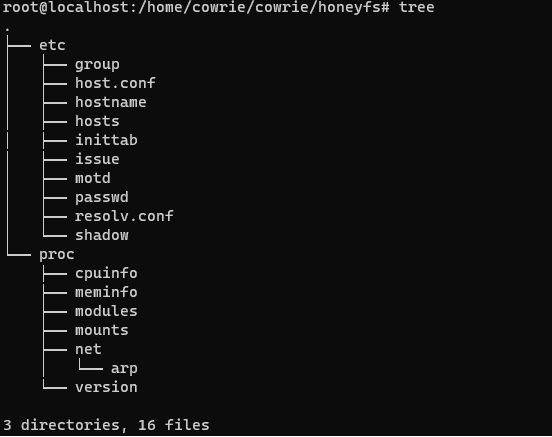
[Tip: if you want to make custom changes towards your honeypot you can me changes in the given below figure if bot attacks they usually get the cpuinfo so you can configure the data]
if you want to get logs it will be stored in /home/cowrie/cowrie/var/log/cowrie and if attacker drops any malware it will be downloaded in /home/cowrie/cowrie/var/lib/cowrie/downloads
[While writing this blog i found and unsual sample dropped in the server hash ‘ITW:bf3c90b1ede5bfc17d51685bcd491055230ea5abf90179ce3ee6d5202dcc808c’ havent analyzed it yet though]
Okay this is our cowrie part, let’s add log4pot
sudo su log4pot
to get to log4pot user.
Then git clone the log4pot repo
cd && git clone https://github.com/thomaspatzke/Log4Pot.git && cd Log4Pot
After doing this you can follow the instrutions on the repo
https://github.com/thomaspatzke/Log4Pot
After setting log4pot remeber to set conf file by
cp log4pot.conf.example log4pot.conf
And making necessary changes in log4pot conf we can run the log4pot
TIP: If you dont wanna add poetry to your PATH you can alternatively call it by travesing towards the location for eg.
~/.poetry/bin/poetry run python log4pot.py @log4pot.conf
Logs will be stored in log4pot.log
Hence your honepots are setup just get the logs, Good Luck and support the community
Refrences:
https://github.com/thomaspatzke/Log4Pot
https://github.com/cowrie/cowrie
https://cowrie.readthedocs.io/en/latest/INSTALL.html